How to get a Locator by XPath
XPath, which stands for XML Path Language, is a powerful query language used to navigate and locate elements in web pages. It offers a syntax for defining paths to specific elements based on their attributes, such as ID, class, or text content. XPath is incredibly useful to testers as it allows for reliable and flexible element identification. It’s especially useful In complex and dynamic applications. With XPath, testers can locate elements even if they don’t have unique attributes or if their positions in the DOM structure change frequently. XPath also supports various functions and operators, making it versatile for advanced element searches and verifications during test automation.
It’s really straightforward to get an element locator using XPath in Playwright. You can use the page.locator function to do this. Simply pass in your XPath as a string, or prefix your string with “xpath=” to make it extra clear.
Example
Let’s locate the header logo on the site below using Chrome Dev Tools
- Right click on the logo and press “Inspect”
- Locate the element in the dev tool
- Right click on the element and choose “Copy XPath” (see below)
- Paste into your code
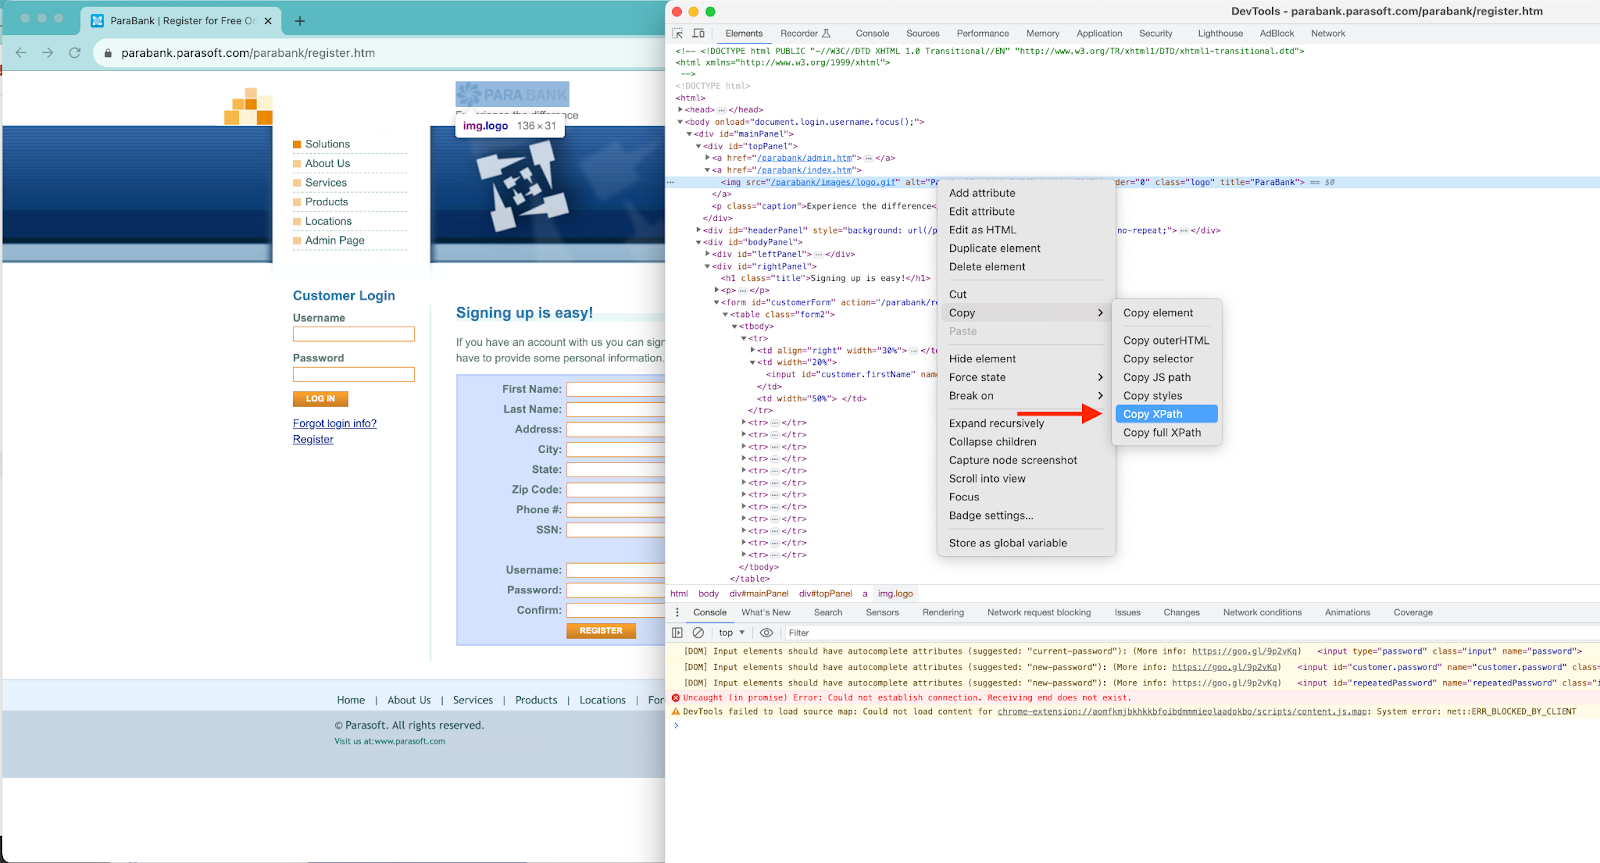
// Find the logo by XPath
await page.locator(‘xpath=////*[@id="topPanel"]/a[2]/img’)
How to get a Locator by Class
Locating elements by class name is crucial for testers. It allows for far more precise and reliable element identification and makes it easy to locate elements that have similar visual attributes. This is especially useful when class names stay the same across page contexts. By using class names as locators, testers can efficiently and accurately interact with specific elements, greatly enhancing the stability and maintainability of their automated tests.
It’s quite easy to locate elements using its class name. Simple make use of the page.locator function and pass in a the css selector for your class name. For example, if your class name is “primary-button”, you’d call page.locator(“.primary-button”).
You can also use other css selectors and filtering in the page.locator function. You can read more about css selectors on MDN’s excellent css article
Example
Let’s look at a class name example. In the screenshot below, we’d like to select all the text fields on the page. Let’s walk through how we could do this:
- Right click on one of the inputs and click “Inspect” to bring up the dev tool
- Find the element in the dev tool and note the
class=”input”attribute. This means we can query by a class name of “input”. - In Playwright, we can write
page.locator(“.input”)to get all the text fields on this page.
// get all text fields on page
await page.locator(“.input”)

// primary buttons in the header
await page.locator(“.header .btn.primary”)
Getting Conditional Locators
It is important to have the ability to retrieve locators conditionally. Not all web elements are easily identifiable using fixed locators. In certain situations, the attributes or properties of an element may change dynamically and throw off normal locator queries. The conditional locator functionality allows testers to dynamically adapt their test scripts to locate and interact with elements that may vary in their attributes or properties. For example, testers might want to use conditional locators when dealing with elements that have identical attributes, but have different contents. This flexibility in locating elements conditionally enhances the robustness and adaptability of test automation scripts.
You can conditionally retrieve locators using the locator.filter function. For example, page.locate(“.btn.primary”).filter({ hasText: “Next” }) will get the next button, but not the previous button.
Example
Let’s look at an example. Say we wanted to get links on the sidebar of the page shown below, but not the link for the current page.
- Right click on one of the links to open Chrome Dev Tool.
- Locate the link element in the tab. It looks like we can query by css locator with
page.locator(“#headerPanel .leftmenu a”). But we still need to conditionally remove “Solutions”. - We can filter that locator with a filter statement. We’ll only include locators that contain an href attribute. Our final query:
page.locator(“#headerPanel .leftmenu a”).filter({ has: page.locator(“[href=*]”) })

// code example
// filter by sub-locator
page.locator(“#headerPanel .leftmenu a”)
    .filter({ has: page.locator(“[href=*]”) })

// filter by text
page.locator(“#headerPanel .leftmenu a”)
    .filter({ hasNotText: “Solutions”) })

// filter by regex
page.locator(“#headerPanel .leftmenu a”)
    .filter({ hasText: /(About Us |Services|Products|Locations|Admin Page)/ })
What’s the difference between Locators and Selectors
Playwright Locators and selectors are easy to get confused. Both are tools used to find elements on a web page, but they’re very different. In your travels, you will mostly use locators, but if you really dive deep, you may use selectors once in a while. So what are these functions and why do you need to know about them?
A locator is an identifier or a way to locate elements within a web page. It is a key component of test automation frameworks like Playwright. Locators can be considered as the address or reference of a specific element on a webpage. They can be based on various attributes such as ID, name, class name, XPath, CSS selector, or other unique properties of the elements. Locators help testers to interact with elements during test execution by providing a means to identify and manipulate them accurately.
A selector, on the other hand, is a sort of locator macro that you can call in the page.locator method. You can define a selector name and create advanced filtering functionality by filtering the raw DOM elements. Unlike a simple locator, a selector provides the ability to target elements based on not just their attributes, but also their properties, states, text content, and even their relationship with other elements. This makes selectors more expressive and adaptable, allowing automation testers to write more advanced and robust tests. Playwright’s extensive selector engine supports various query methods, making it easier to build precise selectors for different scenarios. Ultimately, selectors enhance the accuracy and efficiency of test automation by offering a wider range of targeting options.
Example
Let’s look at the following selector example to understand how it works. Let’s build a selector that finds all primary buttons.
1. First we’ll create our filtering functionality. We need to implement query and queryAll methods.
let btnEngine = () => ({
    query: (root, selector) => selector === “submit” ?
        root.querySelector(“.btn.primary[type=submit]”) :
        root.querySelector(“.btn”),
    queryAll: (root, selector) => selector === “submit” ?
        root.querySelectorAll(“.btn.primary[type=submit]”) :
        root.querySelectorAll(“.btn”),
})
2. Next we need to register our selector with Playwright
await selectors.register(“buttons”, primaryBtnEngine)3. Finally, we can use our selector in our test code
await page.locator(“buttons=submit”) or await page.locator(“buttons”)How to locate multiple elements in one call
One of the helpful features of Playwright’s locator function is the ability to locate multiple elements in one call. This significantly enhances the efficiency and convenience of test automation. With just a single function call, testers can easily identify and interact with multiple elements on a web page simultaneously. This eliminates the need for multiple repetitive function calls, making the test code more concise and readable. It also reduces execution time, leading to faster test runs. Additionally, locating multiple elements in one call simplifies the maintenance of tests, as any changes in the HTML structure can be easily handled by updating a single locator, rather than modifying multiple locators scattered throughout the code. Overall, this feature boosts productivity and improves the overall effectiveness of the test automation process.
There are a few ways to locate and check multiple elements in a single call. The page.locator will return all available matches (which may be multiple elements). Passing a class name like “.btn” could get you all the buttons on the current page. page.getByRole and similar functions will also return all available matches.
// get all the buttons on the page
let allBtns = page.locator(“.btn”);
You can also combine the results of two locator functions using the locator.and function. This is really helpful when there are no overlaps in the type of elements you want to match. Combining the two lists allows you to make a single assertion on the entire list.
// combine two locators
let actions = await page.locator(“.btn”).and(page.locator(“a”))
expect(actions).toHaveCount(5); // should have 5 items on the page.
How to check if locator exists
It is essential to verify if a locator exists in your tests while using Playwright. By confirming that the locator is present, you can ensure that the required element is available and accessible for interaction, such as clicking, typing, or verifying its attributes and values. Thus, having a reliable way to check if a locator exists empowers you to create more robust and accurate test cases, leading to higher quality test automation.
You can check if a locator exists in a few ways. Locator.all will allow you to check if the element exists without any assertions. This can be helpful if you have branching logic that just needs to check what elements are available. For example, you may want to click on the close button if a dialog happens to be present. expect.toBeVisible and expect.toHaveCount allows you to check if an element or elements exist and fail if it doesn’t. This is the most common way to check for elements. For example, if you want to submit the login form, you need to know that the “submit” button exists.
// locator.all()
let dialogElement = await page.locator(“.dialog .btn”).all()

if(dialogElement.length > 0) {
      // dialog present
}

// expect example
expect(page.locator(“.login .submit”)).toBeVisible()

// use count instead of visible (does the same thing)
expect(page.locator(“.login .submit”)).toHaveCount(1)
Tell me about Locator Timeouts
Locators in Playwright, like in many test automation frameworks, have timeouts. Timeouts are crucial because they provide flexibility and ensure that tests can handle dynamic web elements that may take some time to appear or load. By setting a timeout on a locator function, we can control the maximum amount of time Playwright waits before throwing an exception if the element is not found or interacted with. This is particularly important in scenarios where web pages have slow network connections or when running tests on different environments with varying response times. Setting appropriate timeouts helps maintain the stability and reliability of tests, as well as accommodates for unpredictable delays during test execution.
The default timeout on a locator assertion is 5000ms (5 sec). If an element is not matched within that time, the test will fail with a timeout error. 5000ms should be long enough for any loading to be completed, and short enough that the test won’t hang.
But, you may need your timeout to be longer. Sometimes there are slow loading elements or network delays. If a page takes some time to fetch data or render certain components, a longer timeout ensures that Playwright has enough time to locate and interact with those elements before throwing an error. Additionally, websites with heavy content or complex UI often require more time for elements to become visible or interactive. If you have a specific situation that requires a longer wait, you can override the timeout on a per-assertion basis with expect’s timeout configuration property. For example: expect().toBeVisible({ timeout: 10 * 1000 }).
You can read more about timeouts at https://playwright.dev/docs/test-timeouts
Putting it all together
In conclusion, Playwright provides a powerful and flexible way to locate elements on a web page using various locator strategies. Whether you need to locate elements by XPath, class, or apply conditional locators, Playwright has got you covered. Understanding the difference between selectors and locators is crucial for effective element identification. Furthermore, Playwright allows you to locate multiple elements and check for the existence of a locator. And to top it off, you can set locator timeouts to ensure your tests run smoothly. With Playwright’s locator functions, you’ll have the tools you need to write efficient and robust automation tests.